Walk into most gyms today and the likelihood of seeing someone performing a unilateral (means single limb, for you non fitness folks) exercise, minus the ever-popular alternating bicep curl and possibly the occasional lunge, is slim to none. And that’s too bad, considering the numerous benefits there are to be reaped from adding these types of exercises into your training. Muscular strength and balance, athletic performance, increased joint and whole body stability, body awareness and more can all be improved through unilateral training.
But Tyler, what makes you so sure? How do you know?
Because for the first five years of my training career, I hardly performed any of them, and the ones that I did do were certainly not done exceptionally well. Now, thankfully this did not result in any severe injuries or problems, as I am convinced would have been the case had I continued on this path. However, I do believe that consistent and frequent smaller injuries and setbacks may have been avoided better had I trained smarter. The same ligament strain in my left lower back three years in a row, frequent patellar tendon/knee pain coupled with inflammation and poor hip mobility are just a few of the issues that might have been avoided with better balance in my program. Couple these minor issues with horrific lateral/frontal plane (side to side) strength and stability , which stemmed from a direct lack of unilateral training, and I was wonderfully set up for continued setbacks and a potential (major) injury.
(Note): I may have also learned just a thing or two from my boss, Nick Rosencutter. He knows a couple of things about training. Now, do I think that a lack of unilateral training is the exact reason I had those problems and imbalances and issues? No, not completely; but I do think it played a substantial role and that some of those problems could have been corrected and fixed sooner had I placed an emphasis on balancing out my bilateral to unilateral training (double limb to single limb).
So, let’s get to it.
One of the most significant reasons that unilateral training is important for almost everyone is because many daily life and sport activities simply do not occur with two hands/feet, fixed to a specific object, moving said object with both limbs simultaneously. You are constantly moving your arms, legs, hands, and feet independently of one another, and you may not even notice it.
That jog you went on this morning, carrying the groceries in one hand, and walking up and down stairs are all unilateral movements. How about performing a layup, throwing a punch, kicking a soccer ball, a tennis serve, or throwing a baseball, football, etc.? Many sport movements are just unilateral movements performed repetitively.
I can already hear the disagreement. But Tyler, don’t you know that the main barbell lifts like squats, deadlifts, and presses have way more advantages? Don’t you know not everyone has two hours per day to lift and just need to get in a quick workout with the most bang-for-your-buck exercises? Athletes need power and strength more than anything, so why are you worried about their muscular balance and joint stability?
What great questions and concerns! Allow me to explain. Yes, I wholeheartedly agree, as does the research, that compound barbell lifts such as the back squat, bench press, deadlift, etc., have the most benefit when it comes to increased muscle size, strength, and power development. And yes, if you are truly limited on training time and need to get in a quick workout, chances are bilateral exercises are going to be your first go-to, but not always; nor should they be.
Let’s take for example, a basketball player. Their sport requires them to sprint (unilateral), jump (bilateral and unilateral), pass (bilateral and unilateral), and shoot (bilateral), among many other various movements put together in unpredictable combinations and at unpredictable times. This athlete must be able to stop, change direction, pivot, run, jump, lunge, do it quickly and at a moment’s notice, and do it all with a great deal of power and repetitively without fatiguing. Basketball seems hard! Take away the standard jump shot and rebound, and basketball is suddenly an activity that contains virtually all unilateral movements! Wouldn’t it make sense, then, that this athlete has some sort of foundational strength and stability in a unilateral stance? That this athlete should be able to, with proper execution and joint mechanics, move their upper limb in all different directions and planes of motion? That this athlete should be able to properly brace their entire abdomen and trunk, as one unit, while simultaneously jumping off of one foot, perform a layup with their opposite arm, land on both feet, and then run back down the court? If this athlete never trains unilateral exercises and only ever performs bilateral movements, their performance on the court will surely not be up the level it could be, had they structured their training a little better.
As stated earlier, many movements that you perform are not done with both arms and/or legs at the exact same time and working together, and your body isn’t designed that way either! Take for example, the Glenohumeral joint (that’s your shoulder joint for you non-anatomy folks). This joint is made up of multiple different structures, but what I’m concerned with here is your scapula (shoulder blade). Your scapula functions in many different ways. It moves forwards and backwards, known as protraction and retraction, rotates upwardly and downwardly, elevates and depresses, and even tilts. For good overall shoulder function, you need a healthy balance of all of these types of motion, working both arms together and independently of one another. One issue that arises when unilateral training isn’t present in your training is some of these scapular motions tend to get forgotten about and lag behind. If the only pressing you ever do is the standard bench press and its variations, you are not training any protraction. If your pulling movements consist of barbell rows, seated rows, and lat pulldowns, you probably aren’t getting enough upward rotation utilizing your lower traps. The point is your shoulder joint is complex and functions in many different ways, and if you aren’t training all of these different types of motions both unilaterally and bilaterally, you’re leaving your shoulder health to chance.
I know you want to learn more about your shoulder and how it works, so click here to get smart.
Finally, one of the most basic and maybe obvious reasons why you should include unilateral training in your program is for the likely fact that one arm, leg or side of your body is simply not as strong as the other side/arm/leg. Everybody has a strong arm,, “better shoulder,” that leg that feels stronger than the other, etc.

Really, try a set of split squats or alternating dumbbell presses. Chances are (if you’re lacking on your unilateral training) one side feels better or stronger or is easier. Now, what do you think happens when you jump under the bar for your back squats or bench press sets? Do you just automatically disperse the weight evenly between the right and left sides of your body? No! One arm or leg is probably doing a little more of the work to pick up for the slack of the other side. Now, what do you think would happen to your bench press if you brought up that lagging right shoulder? Or your back squat strength if your left quad was as strong as your right? It certainly isn’t about to go down! Unilateral training is a great way to bring up strength deficits and imbalances from one side of the body to the other, or maintain equal strength if you are already fairly balanced. Furthermore, unilateral exercises train different stabilizing muscles that simply aren’t fully engaged with bilateral exercises, leading to better overall muscular development, balance and stability.
Hopefully by this point I’ve convinced you that maybe tossing in a few unilateral exercises into your current program would be a good idea. If you have no idea where to start, check out a few suggestions below.
Squat Pattern
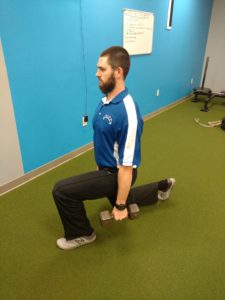
- Reverse lunge
- Step-up
- Supported 1 Leg Squat
Hinge Pattern
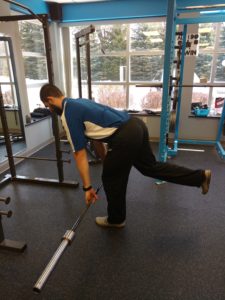
- Single-leg RDL
- Single-leg glute bridge/hip thrust
- Single-leg leg curl
Push Pattern
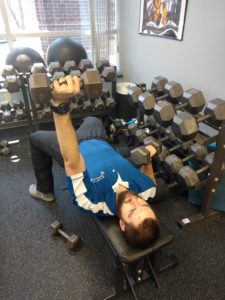
- Alternating DB Bench Press
- Single-arm cable push
- Single-arm DB shoulder press
Pull Pattern
- Single-arm face pull
- Single-arm pulldown
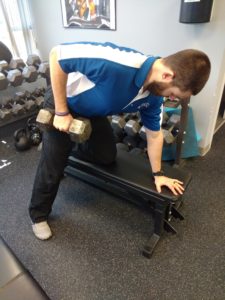
- Single-arm DB Row
Abdominal Exercises
* There are not necessarily any direct unilateral ab exercises, considering your entire trunk functions as one unit to stabilize your torso and spine. However, there are definitely some that may work one side more versus the other at different parts of the movement. Below are some of my favorites and what they focus on.
- Barbell suitcase hold: Lateral stability and frontal plane strength
- Rotating side bridges: Rotational strength and stability
- Kneeling/Standing/Squat Cable Holds: Anti-rotation strength
- Single-Arm Farmer’s Carry: Lateral strength and stability
If this topic interests you and you want to learn more, check out some of these guys and dig through their stuff, because they’re way smarter than me. And older. Which means experience.
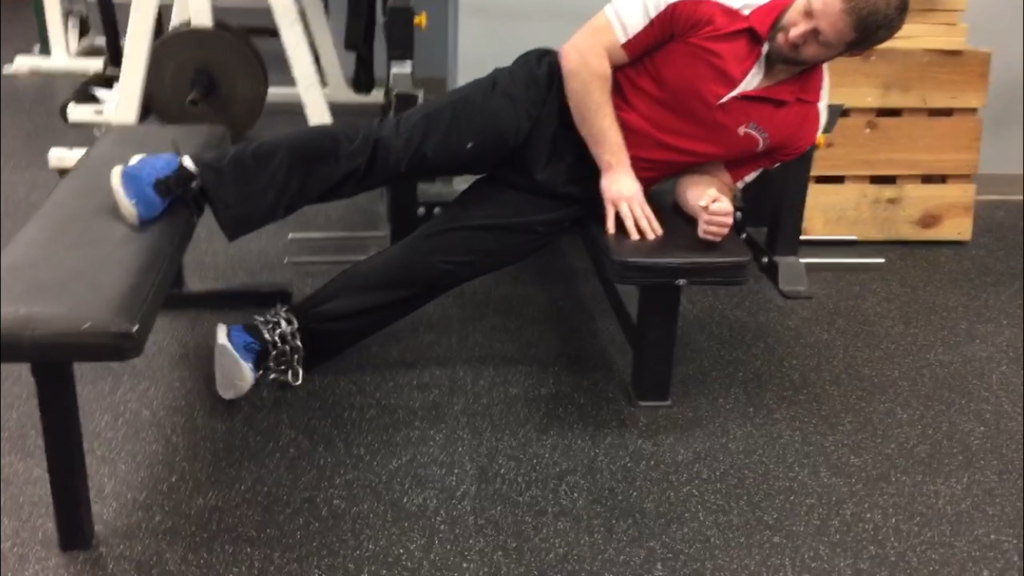
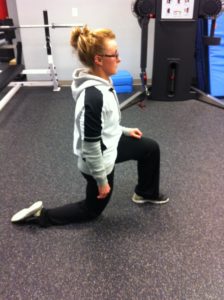 Be sure thigh and trunk are lined up straight as shown and elevate the back foot to increase the pull
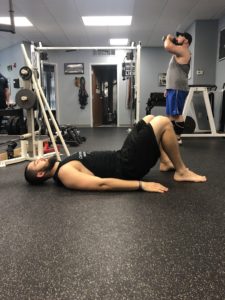
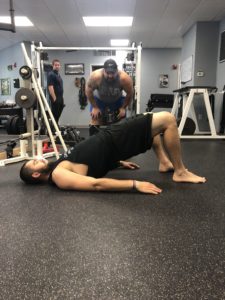 Glute bridge- top position